Tutorial: Split Horizon DNS at Home
24th Aug. 2023 4:35 PM
Cayden Haun
Hey all! First real post on this new site, eh? Let's get right into it, no dilly-dallying.
What it is and What it looks like
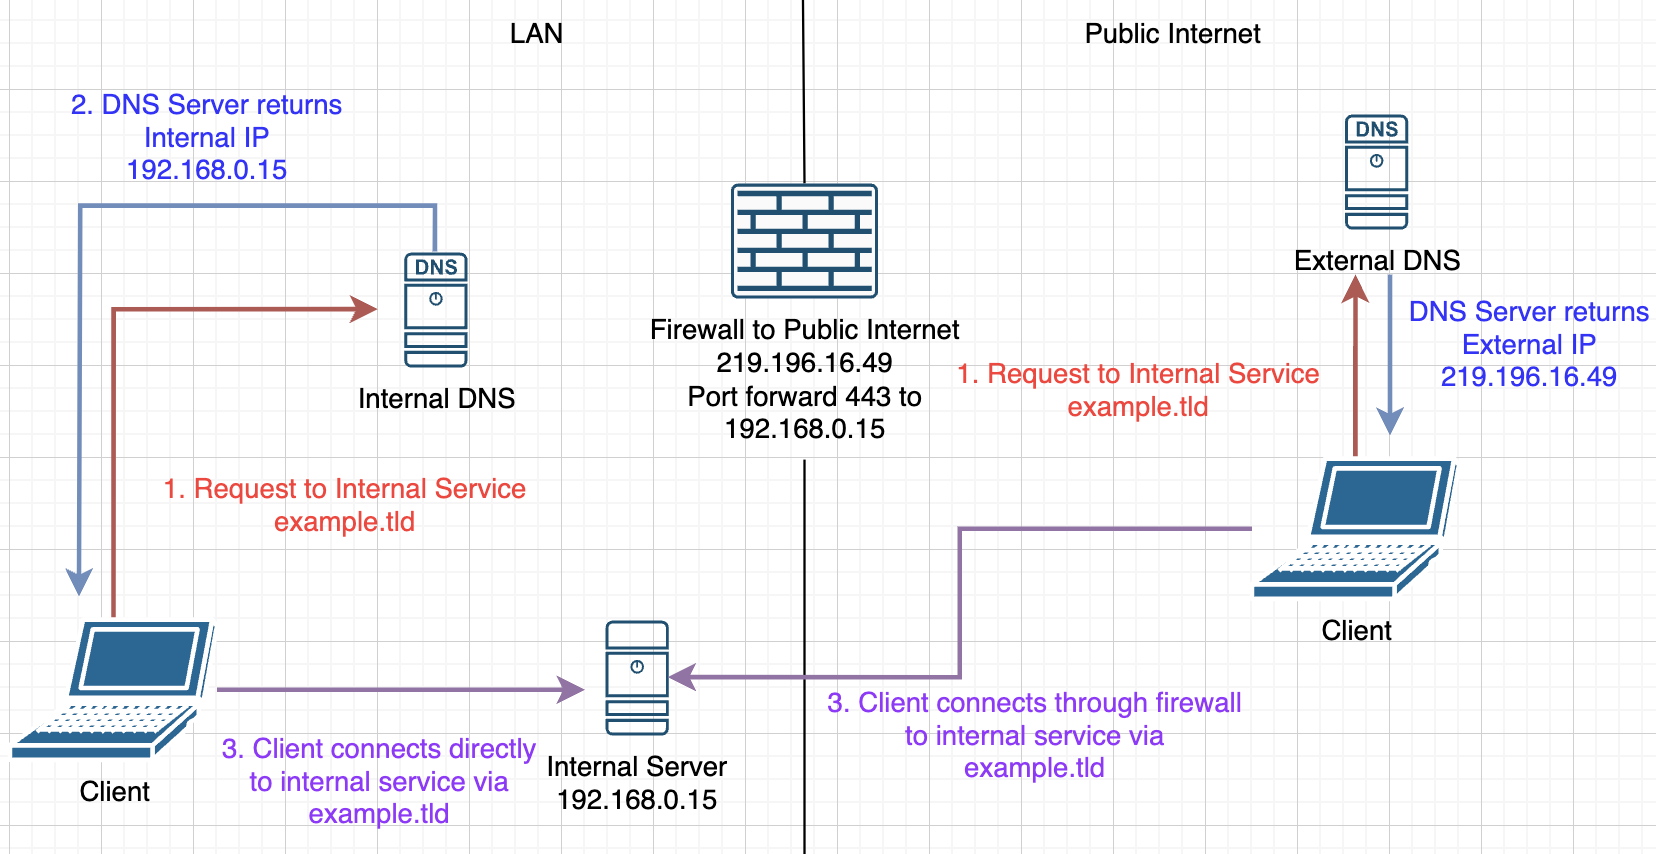
So, split horizon DNS. What exactly is that? Well, I'm just a home-labber, and I'm very much still just a teenager, so I don't know anything you'd find in an enterprise environment, but that doesn't stop me from explaining it to my understanding. Split horizon DNS makes use of a public FQDN that you own to access your internal services both externally and internally. This is done by running a DNS server on your internal network that manages records of your FQDN, while also having public records. So, your basic split horizon DNS setup will look like this:
So, I'm going to assume you have your external DNS set up already, in some way or another. I use a Cloudflare Tunnel, but whatever you have is great too. Let's move onward.
Hardware Setup
In my setup at home, I'm running everything on a Dell Wyse Thin Client Desktop 3030, which I got in a pack of 5 for 40 dollars US. These systems have a humble 4GB of storage, 2GB of RAM, and a dual-core Celeron N2807 at 1.58 GHz. Of course, these systems are thin clients, and we aren't going to be doing so much on it anyway (mine averages around ~150mb RAM usage). The BIOS is usually locked on these devices, to prevent users from tampering with them, but the BIOS password is publicly known. I don't know if I can write it here, but it starts with "fire" and ends with "port" and there's nothing in between. I installed a recent version of Alpine Linux and we're off to the races.
 (Image courtesy of EBay.com)
Setting up the DNS Server
In my home lab, my setup is rather over-complicated, as I enjoy adblocking network-wide, but that can come in another tutorial. Instead of setting up anything fancy, we are just going to install BIND9, which is a version of BIND/named maintained by Canonical, the company behind Ubuntu. Now I do know about the 'controversy' with Canonical and Snap, but BIND is maintained very well, so let's get it installed (you will need root access). Our first command (on Alpine, at least) is
apk add bind
which gets our DNS server installed on the system. Now we should enable the service to run at boot, as we don't want a power outage to ruin our home's network. This is done in OpenRC on Alpine with the command
rc-update add named default
which adds named (The BIND service) to the default run level. Great, our BIND server is installed! Let's move on to configuration.
BIND Configuration
When I started configuring my BIND server, I found all sorts of tutorials on the interwebs for many different configurations. What I ended up landing on is an adapted version based on all of those, so let's start with the basics. The options directive tells the bind server a lot of important things, including the port and working directory. So, that will look like this in your /etc/bind/named.conf:
options {
              directory "/var/bind";
              listen-on port 53 { any }; // This is the listening port for BIND
              forwarders {
                  1.1.1.1 port 53; // This forwards to an upstream DNS server, which could be Pi-Hole, this is Cloudflare's DNS
              }
              forward only;
              allow-query { any; }; // Allows anyone to query the DNS server
              allow-transfer {
                      none; // This is more advanced, maybe I'll write on this in the future ;)
              }
              pid-file "/var/run/named/named.pid"; // Don't mess with this file, it will give you trouble!
              recursion yes; // This is important if you want to use an upstream DNS server
              dnssec-validation yes;
              auth-nxdomain no;
}
If you want to remove the comments, feel free to do so, and remove them especially if they cause errors. This config will set you up with a basic DNS server that forwards all queries to the upstream DNS, which I set as Cloudflare here. Our next configuration is going to be done out of this file, and this is where the split horizon aspect comes in. We're going to create a file in /etc/bind with the name of your external domain formatted like this:
example-com.zone
So in my case, it will be in the file /etc/bind/floridaman7588-me.zone and inside that file we will add a few things.
$TTL 2d // This is the DNS time to live, you might set this lower for testing and quick propagation
$ORIGIN floridaman7588.me.
@               IN      SOA     ns.floridaman7588.me. admin.floridaman7588.me. (
                                2023082400       ; serial // The serial number of your domain, must be updated with every change.
                                                          // I would recommend following the format yyyymmddNN with N being the
                                                          // iteration number for the day
                                12h              ; refresh
                                15m              ; retry
                                3w               ; expire
                                2h               ; minimum ttl
                                )
                IN      NS      ns.floridaman7588.me. // This is just the record for the NS domain we configured above
ns              IN      A       (Your Servers IP) // and the A record for the NS domain, remember to put your IP here
// And from here we can create any DNS records we want internally
// Do note that by having this domain as a record, BIND will not look at it's upstream
// resolvers for it, so you need everything you have exposed publicly in this config as well.
// For example, we need the root domain itself
@               IN      A       (Your internal web servers IP) // The @ sign will tell BIND that this is for the root domain, and
                                                               // remember to put your IP in!
// And finally, add an internal service you want to be accessed only by devices
// that are using your DNS server
internal        IN      A       (Your internal services IP)
Just remember to replace my domain with your own, and the IP addresses with your internal ones, and that's it!
Or is it?
Turns out we still have to add the zone configuration to the BIND configuration file. So, we'll save and exit out of the zone file and return to our named.conf file. At the bottom, we need to point BIND at the new configuration file. This is done with a simple
zone "example.com" IN {
        type master;
        file "/etc/bind/example-com.zone";
}
at the bottom of the file, and now we're done for realsies. Just restart bind with
rc-service named restart
and hopefully, you'll have a brand new DNS server serving your domains with split horizon DNS on the inside and outside of your network. Thanks for reading this tutorial, and have a great day!